Sunday, October 2, 2011

Fenwick Wine Cellars- West Fenwick, DE


I can't say enough good things about Fenwick Wine Cellars. Rob and I both love their wine. Their wine is the only kind of wine we get for our house now. How did we find out about Fenwick Wine Cellar? Well when Rob and I were dating we decided to going wine tasting one weekend. Fenwick Wine Cellar was one of the places we went to taste wine and we both fell in love with their wines. They let you try all of them, which allows you to decide what kind you really like. We have taken Rob's parents and my parents both to Fenwick Wine Cellars and they also loved the wine.
Our all time favorite wine they make is Niagara. It is a sweet white wine. They describe it as "Sweet intense varietal character. Imagine biting into a bunch of freshly picked Niagara grapes". I believe that this is one of the best wines I have ever had.

Fredonia wine is our second favorite wine. It is a red wine, but it is still sweet. I prefer sweet wines so this was a great red wine for me. Fenwick Wine Cellars describes this wine as "If you like red wines that are a little sweet and fruity, you’ll love Fenwick Wine Cellars Fredonia wine. This award winning wind is made with 100% Fredonia grapes, complements a variety of foods, including red meat, pasta or pizza."


  These are our other favorite wines: Concord, Reflections of Fenwick, and Steuben. Fenwick Wine Cellars is a must visit if you live in DE, MD, or are even on vacation at the shore.

Cinnamon Roll Cupcakes

 
 I got this recipe from my Better Homes and Gardens cupcake magazine. They were really good. I  thought the frosting was the best part though! I love using Better Homes and Gardens recipes for cupcakes because they are really easy to follow and the cupcakes turn out looking super pretty too. I think these cupcakes should be a new breakfast treat :) Enjoy!


Cinnamon Roll Cupcakes
 
ingredients
  • 2/3
    cup butter
  • 2
    eggs
  • 2-1/2
    cups all-purpose flour
  • 2-1/2
    teaspoons baking powder
  • 1/2
    teaspoon salt
  • 3/4
    cup packed brown sugar
  • 1/3
    cup finely chopped pecans
  • 2
    teaspoons ground cinnamon
  • 1-3/4
    cups sugar
  • 1-1/2
    teaspoons vanilla
  • 1-1/4
    cups milk
  • 1
    recipe Creamy Butter Frosting
directions 1. Allow butter and eggs to stand at room temperature for 30 minutes. Meanwhile, line twenty-six 2-1/2-inch muffin cups with paper bake cups. In a medium bowl stir together flour, baking powder, and salt. In a small bowl stir together brown sugar, pecans, and cinnamon. Set aside.
2. Preheat oven to 350 degrees F. In a large mixing bowl beat butter with an electric mixer on medium to high speed for 30 seconds. Gradually add granulated sugar, about 1/4 cup at a time, beating on medium speed until combined, scraping sides of bowl occasionally. Beat on medium speed for 2 minutes more or until light and fluffy. Add eggs, one at a time, beating well after each addition. Beat in vanilla. Alternately add flour mixture and milk to butter mixture, beating on low speed after each addition just until combined (batter may look curdled).
3. Spoon about 1 tablespoon batter into each prepared muffin cup. Sprinkle about 1 teaspoon of the brown sugar mixture over batter in cups. Spoon remaining batter evenly over brown sugar mixture in cups. Sprinkle remaining brown sugar mixture over batter in cups.
4. Bake for 18 to 20 minutes or until a toothpick inserted in centers comes out clean. Cool cupcakes in muffin cups on wire racks for 10 minutes. Remove cupcakes from muffin cups. Cool completely on wire racks.
5. Spread or pipe Creamy Butter Frosting onto cupcakes. Store cupcakes in the refrigerator. Makes 26 (2-1/2 inch) cupcakes. 


Creamy Butter Frosting: Allow 1 cup butter to stand at room temperature for 30 minutes. In a large mixing bowl beat butter with an electric mixer on medium to high speed for 30 seconds. Beat in 1 teaspoon vanilla and a dash salt. Gradually add 4 cups powdered sugar, beating until combined. Beat in 1/4 cup whipping cream. Beat in 4 cups additional powdered sugar. Beat in 2 to 3 tablespoons additional whipping cream until frosting is light and fluffy and reaches a spreading (or piping) consistency. Makes 4 cups.

Monday, September 19, 2011

Apple Crisp


Fall is on its way. My neighbor gave me a bunch of apples from their tree so I decided to look for some yummy apple recipes. I ran across this one and I thought it looked super easy. I found it on bettycrocker.com. I have always found that Betty Crocker recipes are pretty good. The apple crisp turned out great and was super easy to make as well.This recipe is highly recommended.


Apple Crisp
4     medium tart cooking apples, sliced (4 cups) 
3/4    cup packed brown sugar 
1/2    cup quick-cooking or old-fashioned oats 
1/3    cup butter or margarine, softened 
3/4    teaspoon ground cinnamon 
3/4   teaspoon ground nutmeg 
Cream or Ice cream, if desired 
 

1)    Heat oven to 375ºF. Grease bottom and sides of 8-inch square pan with shortening.

2)     Spread apples in pan. In medium bowl, stir remaining ingredients except cream until well mixed; sprinkle over apples. 

3)      Bake about 30 minutes or until topping is golden brown and apples are tender when pierced with a fork. Serve warm with cream.

Sunday, August 7, 2011

Instant Pistachio Salad


This salad is great for picnics. It can be made the night ahead of time and can be made and stored in the same bowl, which means less dishes. This salad always reminds me of summer.We love this side dish. Enjoy!


 Instant Pistachio Salad

Ingredients

  • 1 (20 ounce) can crushed pineapple, drained
  • 1 (3 ounce) package instant pistachio pudding mix
  • 1 (8 ounce) container frozen whipped topping, thawed
  • 1/2 (10.5 ounce) package miniature marshmallows

Directions

  1. In a large bowl, combine the pineapple and dry pistachio pudding mix. Fold in thawed whipped topping and marshmallows until well mixed. Refrigerate until chilled and serve.

Friday, August 5, 2011

Stuffed Shells

 Rob and I love stuffed shells (especially Rob). They take some time to make so it isn't my favorite dish to make. I like to make dishes that are super easy, fast, and taste great. That being said when I do find the energy to make stuffed shells the recipe makes enough that we can eat them for a few days so its not too bad :-) Enjoy!


Stuffed Shells

      Ingredients

  • 1 (12 ounce) package jumbo pasta shells
  • 2 eggs, beaten
  • 1 (32 ounce) container ricotta cheese
  • 1 pound shredded mozzarella cheese, divided
  • 8 ounces grated Parmesan cheese, divided
  • 1 tablespoon dried parsley
  • 2 teaspoons salt
  • 1 teaspoon ground black pepper
  • 1 (28 ounce) jar pasta sauce
  • 1 pound ground beef
  • 1 clove garlic, minced

Directions

  1. Preheat oven to 350 degrees F (175 degrees C).
  2. Bring a large pot of lightly salted water to a boil. Add pasta and cook for 8 to 10 minutes or until al dente; drain. 
  3. Brown ground beef with minced garlic. Drain the fat and set aside.
  4. In a large bowl, mix eggs, ricotta, half the mozzarella, half the Parmesan, parsley, salt and pepper until well combined. Stuff cooked shells with ricotta mixture and place in a 9x13 inch baking dish.
  5. In a medium bowl, stir together pasta sauce, ground beef,  reserved mozzarella, and Parmesan. Pour over stuffed shells.
  6. Bake in preheated oven 45 to 60 minutes, until edges are bubbly and shells are slightly set.

Tuesday, August 2, 2011

Egg whites treat burns

I know this post isn't a recipe, but it might be a helpful tip if you get burned in the kitchen while cooking.  I haven't tried this, but I think it sounds like a great idea. Anything that would help a burn heal is okay with me.


BURNS
A young man sprinkling his lawn and bushes with pesticides wanted to check the contents of the barrel to see how much pesticide remained in it.  He raised the cover and lit his lighter; the vapors inflamed and engulfed him.  He jumped from his truck, screaming.  His neighbor came out of her house with a dozen eggs, yelling: "bring me some eggs!"  She broke them, separating the whites from the yolks.  The neighbor woman helped her to apply the whites on the young man's face.  When the ambulance arrived and when the EMTs saw the young man, they asked who had done this.  Everyone pointed to the lady in charge.  They congratulated her and said: "You have saved his face."  By the end of the summer, the young man brought the lady a bouquet of roses to thank her.  His face was like a baby's skin.
  
Healing Miracle for burns:
Keep in mind this treatment of burns which is included in teaching beginner fireman this method.  First aid consists to spraying cold water on the affected area until the heat is reduced and stops burning the layers of skin.  Then, spread egg whites on the affected are.
One woman burned a large part of her hand with boiling water.  In spite of the pain, she ran cold faucet water on her hand, separated 2 egg white from the yolks, beat them slightly and dipped her hand in the solution.  The whites then dried and formed a protective layer.
She later learned that the egg white is a natural collagen and continued during at least one hour to apply layer upon layer of beaten egg white.  By afternoon she no longer felt any pain and the next day there was hardly a trace of the burn.  10 days later, no trace was left at all and her skin had regained its normal color.  The burned area was totally regenerated thanks to the collagen in the egg whites, a placenta full of vitamins.
This information could be helpful to everyone

Tuesday, July 26, 2011

Ham and Cheese Bowties


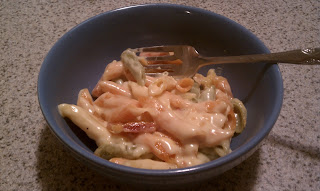
When I found this recipe I was looking for a good dinner that would use some of my leftover ham from Easter. It looked really similar in nature to the mac and cheese recipe I love, so it was a winner in my book. I found that this recipe was really easy to make and it tasted really good as well. We used Ronzoni Garden Delight  Penne Rigati (which I love because it adds a full serving of veggies to your pasta meal without adding anything extra) instead of bow tie pasta, but that was really the only change we made. Rob had the idea that it might be good if we added some broccoli next time we made the dish. Overall it was a great meal that Rob and I both really liked. 


Ham and Cheese Bowties

Ingredients

  • 8 ounces farfalle (bow tie) pasta
  • 1/4 cup butter
  • 1 clove garlic, minced
  • 1/4 cup all-purpose flour
  • 1/2 teaspoon salt
  • 1/8 teaspoon ground black pepper
  • 2 cups milk
  • 1/2 teaspoon prepared mustard
  • 2 1/2 cups shredded Colby cheese
  • 4 ounces cooked ham, julienned
  • 1/4 cup grated Parmesan cheese

Directions

  1. Preheat oven to 350 degrees F (175 degrees C).
  2. Bring a large pot of lightly salted water to a boil. Add pasta and cook for 8 to 10 minutes or until al dente; drain.
  3. In a large saucepan over medium heat, melt butter. Saute garlic 30 seconds. Whisk in flour, salt and pepper. Cook and stir until smooth. Pour in milk, a little at a time, stirring constantly. Bring to a boil for 1 minute. Stir in mustard and Colby. Continue to cook, stirring occasionally, until cheese is melted. Remove from heat and stir in pasta and ham.
  4. Pour into a 2 quart baking dish. Sprinkle with Parmesan.
  5. Bake 20 to 25 minutes, until bubbly and golden.

Saturday, July 23, 2011

Martini Week- Day 7 Flirtini

I had fun doing these posts and sharing my favorite martini recipes for the week. Hope you enjoyed them as well!


Flirtini
1 oz. Vodka
2 oz. Champagne

2 oz. Pineapple Juice
 
Combine Vodka, Champagne, and Pineapple Juice in a highball or collins glass filled with ice

Friday, July 22, 2011


Our cat, Baby, loves catnip so this year I decided to grow some fresh catnip for her. She loves it when I bring a few fresh leaves in for her to eat, but I have huge plants now so I am working on drying it. Below you will see the instructions I followed when drying Baby's catnip. 


How to Dry Catnip   (from http://www.wikihow.com/Dry-Fresh-Grown-Catnip)

  1. Wait until the plant is at least five inches tall. Then, taking scissors, gently cut the plant at the base so you have long stalks of catnip. Be aware that you will want to cut more than you think you need, because the plant is going to dry up and it will turn out to be less than it was originally.
  2. Once you have all the stalks you need, secure the catnip together with either yarn or heavy thread.
  3. Find a dark area (the linen closet is always the best, but any closet will do). Keep in mind that the plant must be hanging upside down and the door must be closed most of the time for the herbs to dry properly. Also, the catnip will lose potency if exposed to light.
  4. Stick a tack to the inside of the door, and tie your catnip around it. Keep it closed and let the drying begin!
  5. Within four to eight weeks (or more depending on how dry your house is, how little sunlight you expose the herbs to etc.) you will have completely dry catnip! Enjoy the smell and watch your cats go wild for the favorite treat!     

I also tried the microwave method for some of the catnip.
Microwave Drying: Microwave drying is a quick and easy way to dry catnip. You’ll want to remove the leaves and flowers from the stems and place them on a paper towel. Cover the leaves with a second paper towel. Microwave them on high for 1 or 2 minutes on high. Let the leaves cool, if they are not dry enough (they should be brittle); microwave them for an additional 30 seconds. Repeat as needed until they are dry, but make sure you don’t scorch them.


    Martini Week- Day 6 Cranberry Martini

    1 oz vodka
    1/2 oz Cointreau orange liqueur
    3 oz cranberry juice
    chopped ice
    lemon slice, for zing and garnish

    Combine all ingredients in a cocktail shaker.
    Add ice so that the shaker is about a third full (ice plus ingredients).
    Shake for 20 seconds.
    Strain into a cocktail glass.
    Squeeze a couple of drops from the lemon slice into the glass, then garnish the side of the cocktail glass with the slice of lemon.


    Thursday, July 21, 2011

    Martini Week- Day 5 Strawberry Martini

    60ml (or approx 2 oz) Vodka
    7.5ml (or approx 1/4 oz) frais de bois (optional)
    7.5ml (or approx 1/4 oz) sugar syrup, or to taste
    5 strawberries (fresh is best)
    8 ice cubes

    In a cocktail shaker, crush 4 strawberries using a barspoon or muddler.
    Add Vodka, frais de bois (optional) and sugar syrup.
    Add ice.
    Shake well.
    Pour and strain into a frosted martini glass.
    Garnish the rim of the martini glass with the remaining strawberry. 

    Wednesday, July 20, 2011

    Martini Week- Day 4 Blue Martini


    Blue Martini Ingredients

    60ml (or approx 2 oz) Bombay Sapphire Gin
    30ml (or approx 1 oz) Blue Curacao Liqueur
    twist of lemon
    6 ice blocks/cubes

    Blue Martini Directions

    Into a cocktail shaker, pour the Gin and Curacao.
    Add ice.
    Shake well.
    Strain and pour into a martini glass.
    Finish by arranging a twist of lemon on the edge of the martini glass.

    Tuesday, July 19, 2011

    Martini Week- Day 3 Chocolate Martini

    Chocolate Martini Deluxe Ingredients

    30ml (or approx 1 oz) Vodka
    30ml (or approx 1 oz) Brown Crème de Cacao
    30ml (or approx 1 oz) Bailey's Irish Cream
    1 tablespoon chocolate syrup
    6 ice cubes
    extra couple of drops of either the Bailey's or the Crème de Cacao
    cocoa

    Chocolate Martini Deluxe Directions

    Into a cocktail shaker, pour the Vodka, Brown Crème de Cacao, Bailey's Irish Crème and the chocolate syrup.
    Add the ice cubes.
    Shake well.
    Rub rim of glass with Brown Crème de Cacao then dip into a shallow dish of cocoa.
    Strain and pour contents of cocktail shaker into a martini glass. 

    Monday, July 18, 2011

    Martini Week Day 2- Pomegranate Martini

    1 oz vodka (or citrus vodka, if you have it)
    1/2 oz Cointreau orange liqueur
    3 oz pomegranate juice
    chopped ice
    1/4 teaspoon lemon juice, for garnish
    sugar, for garnish

    Wet the rim of the cocktail glass with the lemon juice.
    Place sugar in a saucer and dip the rim of the cocktail glass into the saucer, to produce a ring of sugar stuck to the lemon juice as a decorative rim around the glass.
    Combine all ingredients in a cocktail shaker.
    Add ice so that the shaker is about a third full (ice plus ingredients).
    Shake for 20 seconds.
    Strain into a cocktail glass.

    Sunday, July 17, 2011

    Martini Week- Day One Apple Martini

     To celebrate summer I decided to dedicate a week of my blog  to my favorite martini recipes. I am always up for trying a new martini flavor. The recipes I am sharing are from martinirecipe.net. Enjoy!!


    Apple Martini Recipe 

    Ingredients

    30ml (or approx 1 oz) Smirnoff Apple Vodka
    30ml (or approx 1 oz) Apple Schnapps
    30ml (or approx 1 oz) Midori
    30ml (or approx 1 oz) apple juice
    1 slice of green apple

    Apple Martini Recipe Directions

    Into a cocktail shaker, pour the Smirnoff Apple Vodka, Apple Schnapps, Midori and apple juice.
    Add a few ice cubes.
    Shake well.
    Strain and pour into a martini glass.
    To finish, garnish the rim of the martini glass with the slice of green apple.

    Monday, July 11, 2011

    Easy Peanut Butter Pie


    This peanut butter pie is really good and super super easy to make. This recipe is the one my mom always used. It is a great pie to take to a cookout or party as your dish to pass because you can make it the night ahead of time. Clean up is a breeze as well since you just use a large mixing bowl, hand mixer, and a rubber scraper. Enjoy!


    Easy Peanut Butter Pie

    1 c. powdered sugar
    8 oz. Philadelphia cream cheese (softened)
    1c. peanut butter
    8 oz. Cool Whip
    Graham cracker crust
     
    Mix softened cream cheese, powdered sugar, and peanut butter together. Beat until smooth. Add Cool Whip and gently fold in. Pour into ready made graham cracker crust. Chill. Ready to serve in one hour. Add topping such as chocolate or graham cracker crumbs. This can also be done in a ready made Oreo pie crust.

    Wednesday, July 6, 2011

    Cheesy Spinach and Artichoke Dip

    This recipe came from kraft recipes. I LOVE their recipes. I have made this cheesy spinach and artichoke dip many times and it always turns out wonderful! It is so easy to pop into the oven right before guests come. It makes a wonderful dip that can get pared with veggies, crackers, tortilla chips, and/or french bread. 


    Cheesy Spinach and Artichoke Dip

    Ingredients


    1 can (14 oz.) artichoke hearts, drained, finely chopped
    1 pkg.  (10 oz.) frozen chopped spinach, thawed, well drained
    3/4 cup KRAFT Grated Parmesan Cheese
    3/4 cup  KRAFT Light Mayo Reduced Fat Mayonnaise
    1/2 cup KRAFT 2% Milk Shredded Mozzarella Cheese
    1/2 tsp.  garlic powder

    Make It


    HEAT oven to 350°F.
    MIX ingredients; spoon into 9-inch quiche dish or pie plate.
    BAKE 20 min. or until heated through.
    SERVE with TRISCUIT Reduced Fat Crackers and assorted cut-up fresh vegetables. 


    Monday, July 4, 2011

    Candied Apple Pie Cheesecake

    I got this recipe from kraft recipes. Their recipes are amazing. It is a great recipe and really easy to make. I actually made this for Thanksgiving when we had Rob's family at our house. Everyone said they really enjoyed it. I plan on making this again sometime soon! Enjoy

    Candied Apple Pie Cheesecake

    Ingredients

    1 cup crushed NABISCO Ginger Snaps
    3 Tbsp.  butter, melted
    1/2 cup plus 2 Tbsp. sugar, divided
    2 pkg.  (8 oz. each) PHILADELPHIA Cream Cheese, softened
    2 tsp. vanilla
    1/2 cup  BREAKSTONE'S or KNUDSEN Sour Cream
    2 eggs
    1 cup  apple pie filling, divided
    1/2 cup PLANTERS Walnut Pieces, divided
    1/2 cup  toffee bits, divided

    Make It

    HEAT oven to 325°F.
    MIX crumbs, butter and 2 Tbsp. sugar; press onto bottom and up side of 9-inch pie plate.
    BEAT cream cheese, 1/2 cup sugar and vanilla with mixer until blended. Add sour cream; mix well. Add eggs, 1 at a time, beating just until blended after each. Stir in 1/2 each pie filling, nuts and toffee. Pour into crust.
    BAKE 35 min. or until center is almost set. Cool. Refrigerate 4 hours. Top with remaining pie filling, nuts and toffee before serving.

    Thursday, June 16, 2011

    Creme Brulee French Toast


    I found this recipe when I was looking for something interesting for breakfast. Rob and I love this recipe! We usually only make this when we have house guests, since the recipe makes 6 servings. Everyone that has tried this at our house said they really liked it. It is also great to make when you have guests because you make it the night before and then just bake it in the morning. I can't say enough good things about this recipe....you just have to try it! Yummy!


    Creme Brulee French Toast

    Ingredients

    • 1/2 cup unsalted butter
    • 1 cup packed brown sugar
    • 2 tablespoons corn syrup
    • 6 French bread
    • 5 eggs
    • 1 1/2 cups half-and-half cream
    • 1 teaspoon vanilla extract
    • 1 teaspoon brandy-based orange liqueur (such as Grand Marnier®)
    • 1/4 teaspoon salt

    Directions

    1. Melt butter in a small saucepan over medium heat. Mix in brown sugar and corn syrup, stirring until sugar is dissolved. Pour into a 9x13 inch baking dish.
    2. Remove crusts from bread, and arrange in the baking dish in a single layer. In a small bowl, whisk together eggs, half and half, vanilla extract, orange brandy, and salt. Pour over the bread. Cover, and chill at least 8 hours, or overnight.
    3. Preheat oven to 350 degrees F (175 degrees C). Remove the dish from the refrigerator, and bring to room temperature.
    4. Bake uncovered 35 to 40 minutes in the preheated oven, until puffed and lightly browned.

    Sunday, June 12, 2011

    Texas Hash


    I love making casseroles because for the 2 of us it means many meals. We usually cut the leftovers into single serve portions, put them in plastic storage containers and freeze them to eat later. This casserole is great for that because it reheats great and still tastes amazing. It gives us healthy meals to take to work for lunch.We have made this casserole many times and it always tastes great and is pretty easy to make as well.


    Texas Hash
    • 1 to 1 1/2 lb ground beef
    • 3 large onions, sliced
    • 1 clove garlic, minced
    • 1 green bell pepper, seeded, chopped
    • 1 can diced tomatoes with juice
    • 1/2 cup uncooked long-grain rice
    • t teaspoon chili powder
    • 1 to 2 tsp. salt
    • 1/2 tsp pepper

    1. Preheat oven to 350 degrees F
    2. Lightly grease a 2-quart casserole dish
    3. Brown beef and onions in a large skillet over medium-high heat
    4. When onions are translucent, add garlic and green pepper; cook until green pepper is softened
    5. Remove from heat; stir in remaining ingredients
    6.  Transfer mixture to the casserole dish; cover with foil or a lid and bake for 45 mins. Remove cover and bake 15 mins. longer. (Rob likes to cover the casserole with shredded sharp cheddar cheese once the cover is removed. This is optional and wasn't part of the original recipe.)

    Friday, June 10, 2011

    Basil and Pesto Hummus

    For some reason I can't ever get Hummus to turn out as creamy as it is when we buy it in the store. That being said this recipe is a good recipe and it adds a lot of flavor to the hummus. We made it when we had our neighbors over and they said they thought it was good. I loved that I could use basil from my herb garden for this recipe, but I'm still not sold on homemade hummus. 


    Basil and Pesto Hummus

    Ingredients


    • 1 (16 ounce) garbanzo beans (chickpeas), drained and rinsed
    • 1/2 cup basil leaves
    • 1 clove garlic
    • 1 tablespoon olive oil
    • 1/2 teaspoon balsamic vinegar
    • 1/2 teaspoon soy sauce
    • salt and ground black pepper to taste

    Directions

    1. Combine the garbanzo beans, basil, and garlic in a food processor; pulse several times. Use a spatula to push mixture from sides of processor bowl. Pulse the mixture again while drizzling in the olive oil. Add the vinegar and soy sauce; pulse until combined. Season with salt and pepper.

    Saturday, June 4, 2011

    Classic Potato Salad

     
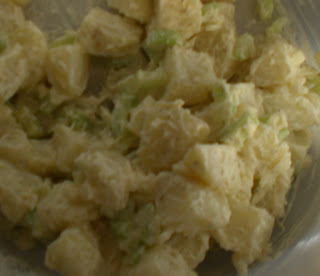
    Rob and I love potato salad. It is an easy side dish to make, its inexpensive, and goes with just about everything. We usually pair it with hot dogs or hamburgers. There are many recipes out there for potato salad and everyone seems to have their own way to make potato salad. I wanted to post this recipe on a day that I really wanted to celebrate summer and today seemed like a great day. Enjoy!

    Classic Potato Salad

    Ingredients:

    • 8 medium potatoes, cooked and diced
    • 1 1/2 cups mayonnaise
    • 2 tablespoons cider vinegar
    • 1 tablespoon yellow mustard
    • 1 teaspoon salt
    • 1/2 teaspoon pepper
    • 2 celery ribs, sliced
    • 1 cup onion, minced
    • 5 hard-boiled eggs (optional)
    • paprika (optional)
    Directions:
    1. Peel and dice potatoes. 
    2. Bring a large pot of water to a boil.
    3. Boil peeled and diced potatoes in salted water until done. Cook until tender but still firm, about 15 minutes. Cool by running under cold water.
    4. Place diced potatoes in large bowl.
    5. Mix mayonnaise, cider vinegar, mustard, salt, and pepper in another bowl.
    6. Add to potatoes.
    7.  Add celery and onions and mix well.
    8. Slice hard boiled eggs and place on top. (optional)
    9. Sprinkle a little paprika on top. (optional)

    Sunday, May 29, 2011

    5 Minute Chocolate Mug Cake

    This is a recipe that I received from my mother-in-law. She got it in an e-mail and she thought it was a recipe that I would like. Of course since it is easy to make and chocolate I had to give it a try. Overall the cake wasn't the best I have ever had, but I would think about making it again if I want something sweet and quick to make. I would recommend eating it with ice cream because the cake itself was a little heavy by itself. It does make a nice size cake for one person and you can eat it right out of the mug (which means less dishes to clean and in my book that's always a plus). Next time I make this maybe I will share some with Rob.

    5 MINUTE CHOCOLATE MUG CAKE
    4 tablespoons flour
    4 tablespoons sugar
    2 tablespoons cocoa
    1 egg beaten
    3 tablespoons milk
    3 tablespoons oil
    3 tablespoons chocolate chips (optional)
    A small splash of vanilla extract
    1 large coffee mug (MicroSafe)

    Add dry ingredients to mug, and mix well.  Add the egg and mix thoroughly.
    Pour in the milk and oil and mix well..
    Add the chocolate chips (if using) and vanilla extract, and mix again.
    Put your mug in the microwave and cook for 3 minutes at 1000 watts.
    The cake will rise over the top of the mug, but don't be alarmed!
    Allow to cool a little, and tip out onto a plate if desired.
    EAT ! (this can serve 2 if you want to feel slightly more virtuous)..
    And why is this the most dangerous cake recipe in the world?
    Because now we are all only 5 minutes away from chocolate cake at any time of the day or night!

    Thursday, May 26, 2011

    Homegrown Benefits


    Rob and I recognize the benefits of homegrown produce. My parents have always had a huge garden so I grew up with lots and lots of fresh veggies, herbs, and fruit. Last year Rob and I planted basil, tomatoes, and green peppers in pots on our front porch. We had great luck with the basil, but our tomato and green pepper plants didn't do as well as I had hoped (due to a Tomato Horn Worm invasion). As most of you know we live in Delaware so it gets pretty hot here in the summer and my yard doesn't have any shade so we plant in pots and put them on the front porch. This year we went with all herbs (since we loved having fresh basil all summer last year). This year we planted a mixed pot of basil, oregano, and parsley and two catnip plants for baby. Next year we might put in a full garden, after we get some trees planted for a little shade from the hot sun.


    Some of the benefits of growing your own vegetables and/or herbs
    • You are assured fresh vegetables. A lot of vegetables lose at least some of their vitamins as soon as they are gathered, so being able to take them from the garden to the table in a matter of minutes, ensures you gain the maximum possible health benefits from your homegrown vegetables.
    • Value for money.It is cheaper to grow your own vegetables and herbs at home. When you first start there will be some expenses such as pots, soil, fences, or other materials, but in most cases these are things that you can use year after year.
    • You can grow organic vegetables.You are guaranteed that your produce is organic because nothing is going on them unless you put it there. This is a huge benefit if you have people in your family with allergies.
    • Children actually learn where vegetables come from, how they grow and what they look like.  Growing vegetables yourself is providing them with a valuable life skill and education - while they have fun and plenty of fresh air! 
      Top ten most popular homegrown veggies according to The Gardeners Rake website:
      1. Tomatoes
      2. Peppers (hot peppers con be used to aid in colds and cayenne pepper can help heal a deep cut)
      3. Cucumbers (the inside of a cucumber can be up to twenty degrees cooler than the outside temperature. This is where the saying cool as a cumber came from)
      4. Onions (used as a cold remedy and they are said to help cure many ailments)
      5. Beans (Snap beans grow in both green and yellow varieties. There is a purple wax bean that turns green when it is cooked)
      6. Lettuce (Americans consume about 30 lbs. of lettuce each, per year)
      7. Carrots (English women in the 1600’s often wore carrot leaves in their hats in place of flowers or feathers)
      8. Sweet Corn (Corn is the most widely grown crop in America but only 10% is used at the dinner table)
      9. Radishes (radishes were originally grown for their size and could be as large as 50 to 100 pounds each)
      10. Cabbage. (Babe Ruth uses a cabbage leaf under his ball cap to keep cool. He changed it every two innings)


      So get out there are start planting, even if you start out with only a few plants you will see the benefits!

        Tuesday, May 24, 2011

        Slow Cooker Stuffed Peppers

        I love this recipe because it is easy, I can stuff the peppers the night before and then put them in the slow cooker before I go to work in the morning. I love having dinner pretty much done by the time I get home. Like many of my recipes I have adapted this one over time. My mom made stuffed peppers when I was young so I took the basic recipe and made it my own. The recipe is so easy, give it a try and put your own spin on it.


        Stuffed Peppers
        ·         1 lb. lean ground beef
        ·         ¼ cup onion diced
        ·         1 egg
        ·         1 cup instant rice, uncooked
        ·         1 clove garlic, minced
        ·         ½  teaspoon black pepper
        ·         ½ cup bread crumbs (Italian)
        ·         2-3 large green bell peppers
        ·         Jar spaghetti sauce

        1.    Wash peppers, cut tops off and remove core. 

         2.       In a bowl, mix the ground beef, onion, egg. rice, garlic, black pepper, and bread crumbs.  (everything except for the spaghetti sauce and the peppers)
         3.     Stuff each pepper with of the ground beef and rice mixture until full.

        4.       Put ¼ cup of the spaghetti sauce in the Crockpot. Nestle the peppers into your Crockpot. Pour the remaining sauce over the peppers.
              5.       Cook on low for 6-8 hours. This can vary depending on your Crockpot. Be sure to use a     meat thermometer to ensure the inside is cooked to 160°F

        Sunday, May 22, 2011

        Easy Shrimp Pasta for Two

         
        Rob and I love this recipe. It is easy to make and it really makes the perfect amount of food for two people. It is a great meal when you want to make somethings that doesn't take a super long time to make. The total time from start to the table is about 45 mins. We usually use frozen shrimp for the recipe and have found that this is easier since frozen shrimp we buy are deveined. We just have to peel the shrimp and start working on the recipe.


        Easy Shrimp Pasta for Two 

        Obtained from: www.kraftrecipes.com

        • 2 Tbsp. KRAFT Balsamic Vinaigrette Dressing 
        • 1/2 lb.  uncooked large shrimp, peeled, deveined 
        • 1/4 lb. fettuccine, uncooked 
        • 1   tomato, chopped 
        • 2 oz. (1/4 of 8-oz. pkg.) PHILADELPHIA Cream Cheese, cubed
        • 2 Tbsp.  chopped fresh basil, divided
        • 2 Tbsp. KRAFT Shredded Parmesan Cheese

        1. POUR dressing over shrimp in small bowl. Refrigerate 20 min. to marinate.
        2. COOK pasta as directed on package. Meanwhile, heat large skillet on medium heat; add shrimp; cook 3 min. or until shrimp turn pink, stirring frequently. Remove shrimp from skillet; cover to keep warm.
        3. ADD tomatoes, cream cheese and 1 Tbsp. basil to same skillet; cook and stir 3 min. or until well blended. Add shrimp; cook until heated through, stirring occasionally.
        4. DRAIN pasta. Place on large platter; top with the shrimp mixture, remaining basil and shredded cheese.

        Tips  

        Substitute: Prepare using thawed frozen shrimp.

        Note:
        For a thinner sauce, stir small amount of milk into sauce with the shrimp.